
How to Configure the WRT160 as OpenVPN Server PART II
Warning: This article was published many years ago (greater than two) Apr 22, 2011. Some information may be outdated.
Configure the WRT160Nv3 as OpenVPN Server by following the following steps.
1. Configure the FireWall
Login to the WRT160Nv3 and go to the TAB Administration > TAB Command
cut paste the following
iptables -I INPUT 1 -p udp –dport 1194 -j ACCEPT
iptables -N VPN
iptables -F VPN
iptables -I INPUT -i tun0 -j VPN
iptables -I FORWARD -i tun0 -j VPN
iptables -A VPN -i tun0 -o br0 -j ACCEPT
iptables -I POSTROUTING -t nat -o tun0 -j RETURN
CLICK save FireWall
2. Configure the Startup Script
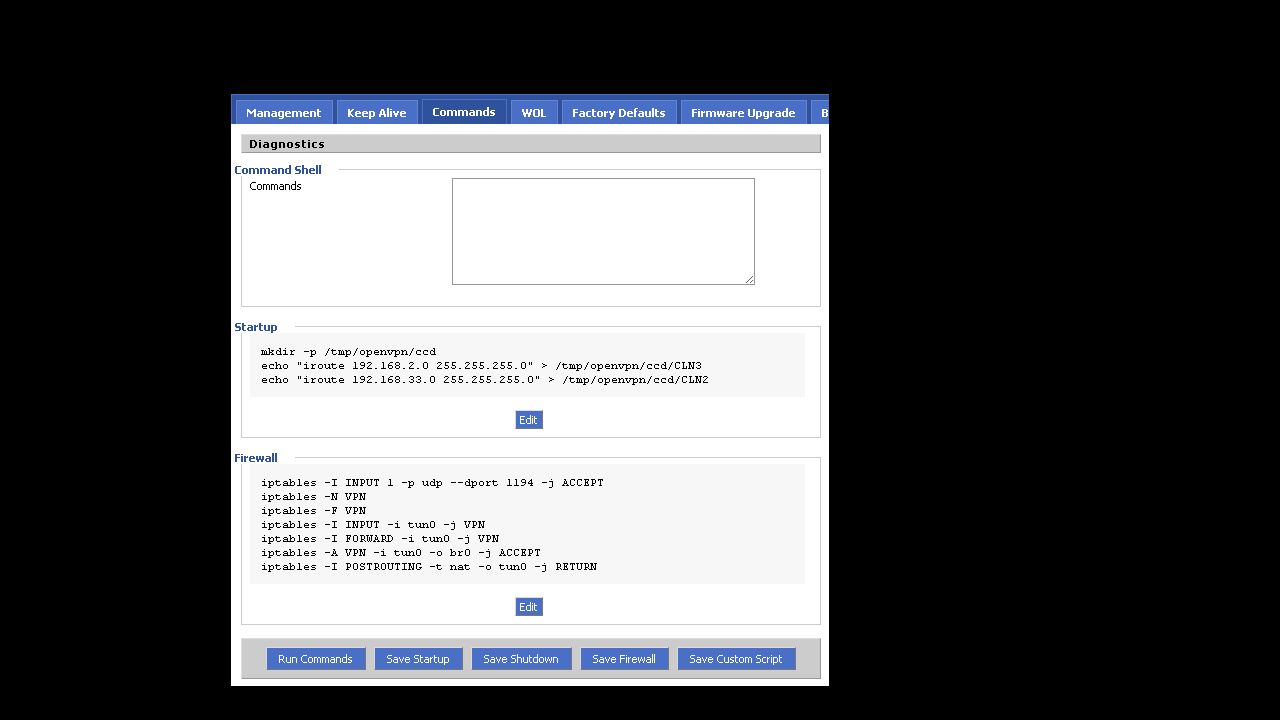 |
| This is how it looks |
go to the TAB Administration > TAB Command
mkdir -p /tmp/openvpn/ccd
echo “iroute 192.168.2.0 255.255.255.0” > /tmp/openvpn/ccd/client1
echo “iroute 192.168.33.0 255.255.255.0” > /tmp/openvpn/ccd/client2
CLICK save Startup
Note:
Change the 192.168.2.0 255.255.255.0 to the IP and subnet Mask of the Camera and PC at Client 1 Site
Change the 192.168.33.0 255.255.255.0″ to the IP and subnet Mask of the Camera and PC at Client 1 Site
3. Configure the OpenVPN server
go to the TAB Services > TAB VPN
CLICK Enable OpenVPN Server
Cut Paste the CA,crt Certificate to GUI window CA
Cut Paste the Server,crt Certificate to GUI window Client
Cut Paste the Server.key Certificate to GUI window Client Key
Cut Paste the dh1024.pem Certificate to GUI window dh
4. Configure the openVPN
Cut paste the following
— start —
# the IP of the PC & Camera at the server site
push “route 192.168.1.0 255.255.255.0”
# the Virtual IP for the VPN
server 192.168.66.0 255.255.255.0
dev tun0
proto udp
keepalive 10 120
dh /tmp/openvpn/dh.pem
ca /tmp/openvpn/ca.crt
cert /tmp/openvpn/cert.pem
key /tmp/openvpn/key.pem
# Only use crl-verify if you are using the revoke list – otherwise leave it commented out
# crl-verify /tmp/openvpn/ca.crl
# the IP of the PC & Camera at the client1 site
push “route 192.168.2.0 255.255.255.0”
# the IP of the PC & Camera at the client1 site
push “route 192.168.33.0 255.255.255.0”
client-config-dir /tmp/openvpn/ccd
# the IP of the PC & Camera at the client1 site
route 192.168.2.0 255.255.255.0
# the IP of the PC & Camera at the client2 site
route 192.168.33.0 255.255.255.0
client-to-client
;push “redirect-gateway”
comp-lzo
# management parameter allows DD-WRT’s OpenVPN Status web page to access the server’s management port
# port must be 5001 for scripts embedded in firmware to work
management localhost 5001
— End —
Reboot the WRT160Nv3
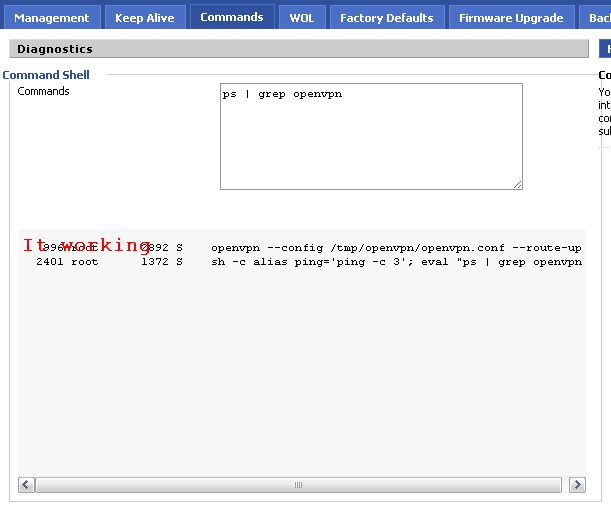 |
| Enter the above and click Run Command |
 |
| If you see log file it means ur good |
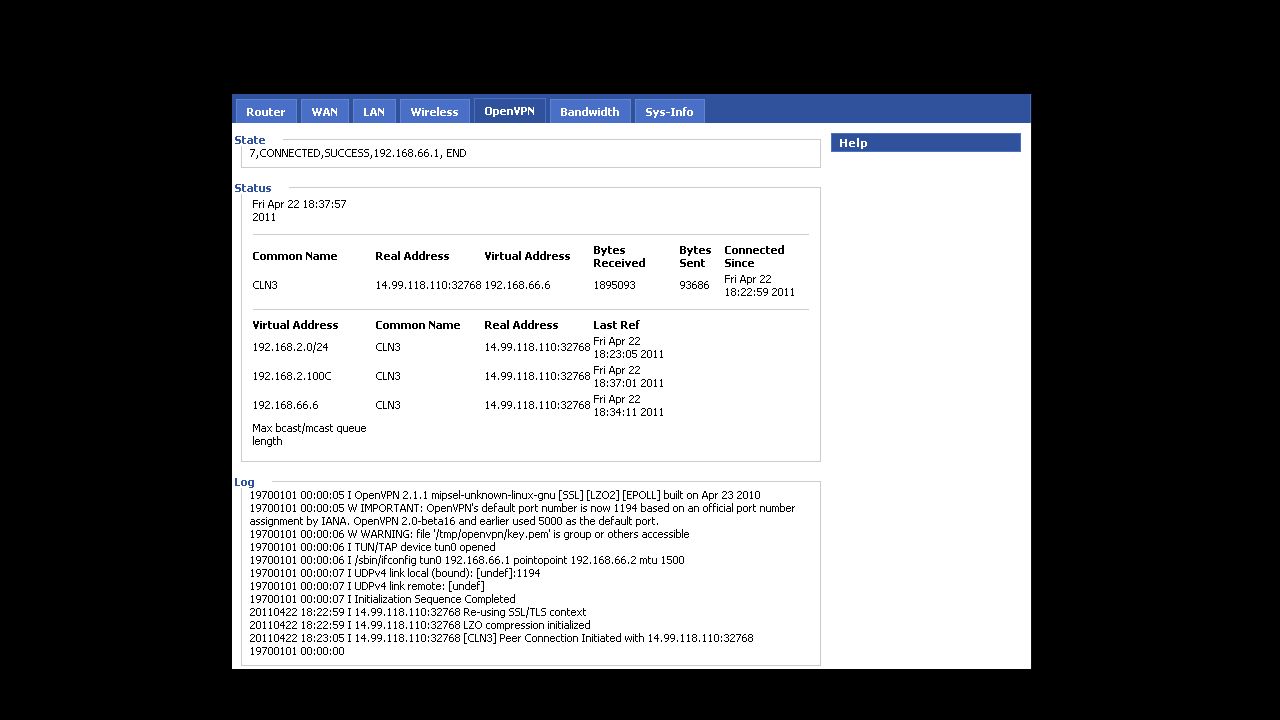
If you see this Images then you have the server working
Additional info
How to Configure the WRT160Nv3 as OpenVPN Server by following the following steps … Read the How to Configure the WRT160 as OpenVPN Server PART III
WARNING: Each of the Site Should have unique IP’s or you will have difficulty.